

Deflicker
Instructions to deflicker
This mode allows you to stabilize the brightness of a movie.
The pictures taken may suffer from minimal changes in brightness when viewed in rapid succession create a disturbance in the video product.
This disorder is referred to as flicker.
The purpose of the program is to calculate the brightness of the frames that make up the video.
Once this calculation, tries to predict the variations in exposure in such a way that the pictures resulting from the subsequent processing with Lightroom all have a brightness almost identical.
The program provides the following commands:
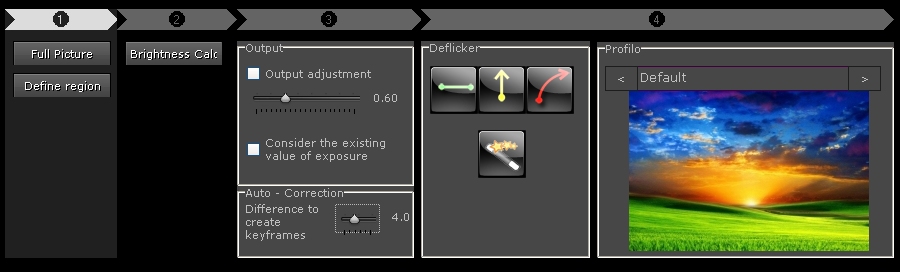
The first thing to do is tell the program whether to calculate the brightness of the program to use the “full picture” or just an area of the same (“Define region”).
After this choice, we can proceed with the calculation of brightness.
With “Brightness calc“, the program calculates the brightness for each frame.
Attention. Depending on the amount of photos to process and computer available, the processing time can be long.
Once this is done, the program will store the results in a way that you can use them again later. Thanks to this store whenever we return to this directory will no longer be ‘necessary to recalculate this value.
To find out if a directory has already been processed with this just look at the column Lum. If there are values, then it is not necessary to perform the operation.
One reason for these again to calculate the luminosity may be a willingness to use only part of the calculation. This is because by default, the calculation of the brightness is performed on the whole frame. you can select a region to calculate the value. To do this simply press the “Define region” button.
The screen will change as follows:

On the enlarged image, you can using the mouse, define the region where the program has to act. Creating a region, the program automatically creates keyframes.
Use the arrow buttons of the player, you can select the frame in which we want to create the region.
When creating a new keyframes, the program, in an automatic way, calculates the interpolations of the region between the various keyframes (to do it automatically creates a keyframe in the last frame).
Glancing through the frame with the arrow buttons, you can view the progress of the region.
Once you find the region that interest us, we can exit this mode by pressing the Exit button
At this point, the program returns to the previous step and from here it is possible to recalculate the brightness.
This time, the program will use for the calculation of brightness, only those portions of the images defined. To do this press Brightness calc.
After that has been calculated brightness of each frame, the program shows a graph through the performance of the same.
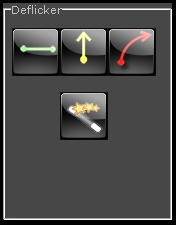
After recalculating the brightness, we can calculate the value of the program to suggest exposure to achieve uniform brightness. To do this, simply press one of the options for the deflicker represented by buttons:
If you did this calculation, the chart will show these values.

The orange line shows the curve of brightness in the original frames.
The green line indicates the trend of the correction to be applied to even out the brightness value. (This trend will tend to be mirrored with respect to brightness)
The blue line, instead, indicates the result of the correction (more this line is uniform, the better is the action of correction performed)
In the graph may also be present other symbols.
The dots in the three lines described above indicate the frame that is currently being previewed.
The dashed white line, indicates that the frame is a keyframe.
The line below (which can be of different colors) indicates the type of formula used for the calculation of the correction (see chapter Deflicker Options).
We can now see a preview of the work done by the program. To see this preview, we can use the player for the program.
Please note the preview displayed by the program is only an approximation of the final result. The end result created with Lightroom might be quite different.

In the event that the result of the final rendering does not satisfy us (ie the one made by LR and not the one made by the program) you should change the parameter correction output.
If in the sequence of images there are very large and sudden changes in brightness (difference between two adjacent frames greater than 5), the program can give unsatisfactory results.
We can solve the problem by changing the magnitude of the change suggested by the program.
To do this we can use the Output Adjustment.
Select a desired value (if the changes are about 5/6 unit then we recommend a value of about 0.6. If you are over or recommend a value of about 5. Do not overdo this value). The program reports these potential problems by an icon (yellow triangle)
We enable this feature by checking the corresponding checkbox (Output adjustment)
The desired value, it is possible to recalculate the values to suggest pressing one of the options for the deflick.
In the case in which we had already made changes to exposure via the program Lightroom, we can tell the program to take account of these values. The program will sum up the existing values to the calculated value.
To do this you can use the checkbox “considers the existing values of exposure”
This option ( for example) can be useful if you want to simulate a typical gradual lowering of the brightness in the sunsets . Using the interpolation function ( for further explanation see special page ) we can calculate this reduction .
It is sufficient to make the first frame a keyframe , move to the last frame , enter a correction value -2 ( for example) and to calculate the interpolation of the data.
Without this, the exposure value will be a decreasing value from 0 to -2.
If we set the parameter ” considers the existing values …“, the value obtained from the operation of deflick will be added to this value decreasing . It will therefore be the sum of the two interventions (interpolation + deflick ) .
The end result will be a video with the brightness decreases evenly .
Another reason to use this parameter, and when we realize that the pictures should be all changed by increasing or decreasing the exposure of a certain value (constant for all images) . It is sufficient to do this in lightroom ( or via the interpolation function , putting equal values at the beginning and at the end) before saving the metadata to be read by the program.

The list that contains the images to be processed consists of several columns.
Between the columns, the second (green dots) indicates the type of interpolation used by the program (see separate chapter)
The orange column contains the value of the brightness of the frame as calculated by the program.
The blue column contains the value of the brightness after application of the correction suggested by the program.
The green column contains the value of exposure suggested to change the frames.
In the case in which the sequence of photographs has been generated by the control programs that modify the camera in automatic mode the exposure time or aperture (in practice the classic operation for a bulb ramping done for example with Magic Lantern), a simple correction is not will be sufficient.
The program for this type of operation makes a separate function Wizard (see separate section), which automatically creates of keyframes (frames that need to be processed in keyframes, are highlighted with a blue triangle).
It is possible to process the data in different ways using the settings Manuals (see separate chapter)
Since version 2, the program provides the ability to process images using the correction profiles designed specifically. you can use one of the profiles provided, or create your own profile (only for experts) Profiles (see separate chapter).
The profiles are used to calculate the correction values suggested, using the photograph itself as a yardstick, or using generic profiles.
The results obtained with this technology are much more accurate
Through the player, you can preview (not 100% reliable) the effect of the corrections. simply put the saw on the appropriate box and press the rendering of the play.
After creating the necessary image, the program will display a movie in the preview pane with the effect of the adjustments.
You can change the frame rate of this preview by changing the parameter found in Settings.
Below is a brief tutorial
Once you have viewed the effects, if they are to our liking, we can make them effective by pressing the Save button XMP.
In this way, the program overwrites the data in the xmp file.

Support TLTools, Make A Donation
Please make a donation if you enjoy using our software and believe in the importance of what the ciemmesoft is working to accomplish.

Fai una donazione!
Sostieni il progetto, fai una donazione TLTools è un progetto gratuito. Fai una donazione se ti piace utilizzare il nostro software e se credi nell'importanza di ciò a cui il progetto lavora.